Start: 10/25/08
Finish: 05/14/11
Total Time: 697 Hours
This single chapter probably represents the bulk of most builders’ time investment. There are a couple of things that contribute to the length of time required for this chapter.
The first factor is the quality of the initial glass work. How accurate one was in building the structures and laying up the skins will have a very direct impact on the amount of work needed to make it all smooth, and pretty in the finishing step. We have no delusions that our work is anything close to perfect at all. This being our first aircraft we had lots to learn along the way.
The second factor in finishing time is the methods you chose for the tasks. The plans methods for finishing are tried and true, no argument about that. There are a couple of steps which we believe others have found a better method for, however. Composite construction involves a LOT of sanding. I can’t imagine any other craft which involves as much sanding. It comprises a very substantial amount of the total build time. Methods which improve efficiency in this area are greatly worth investigating…providing they are safe.
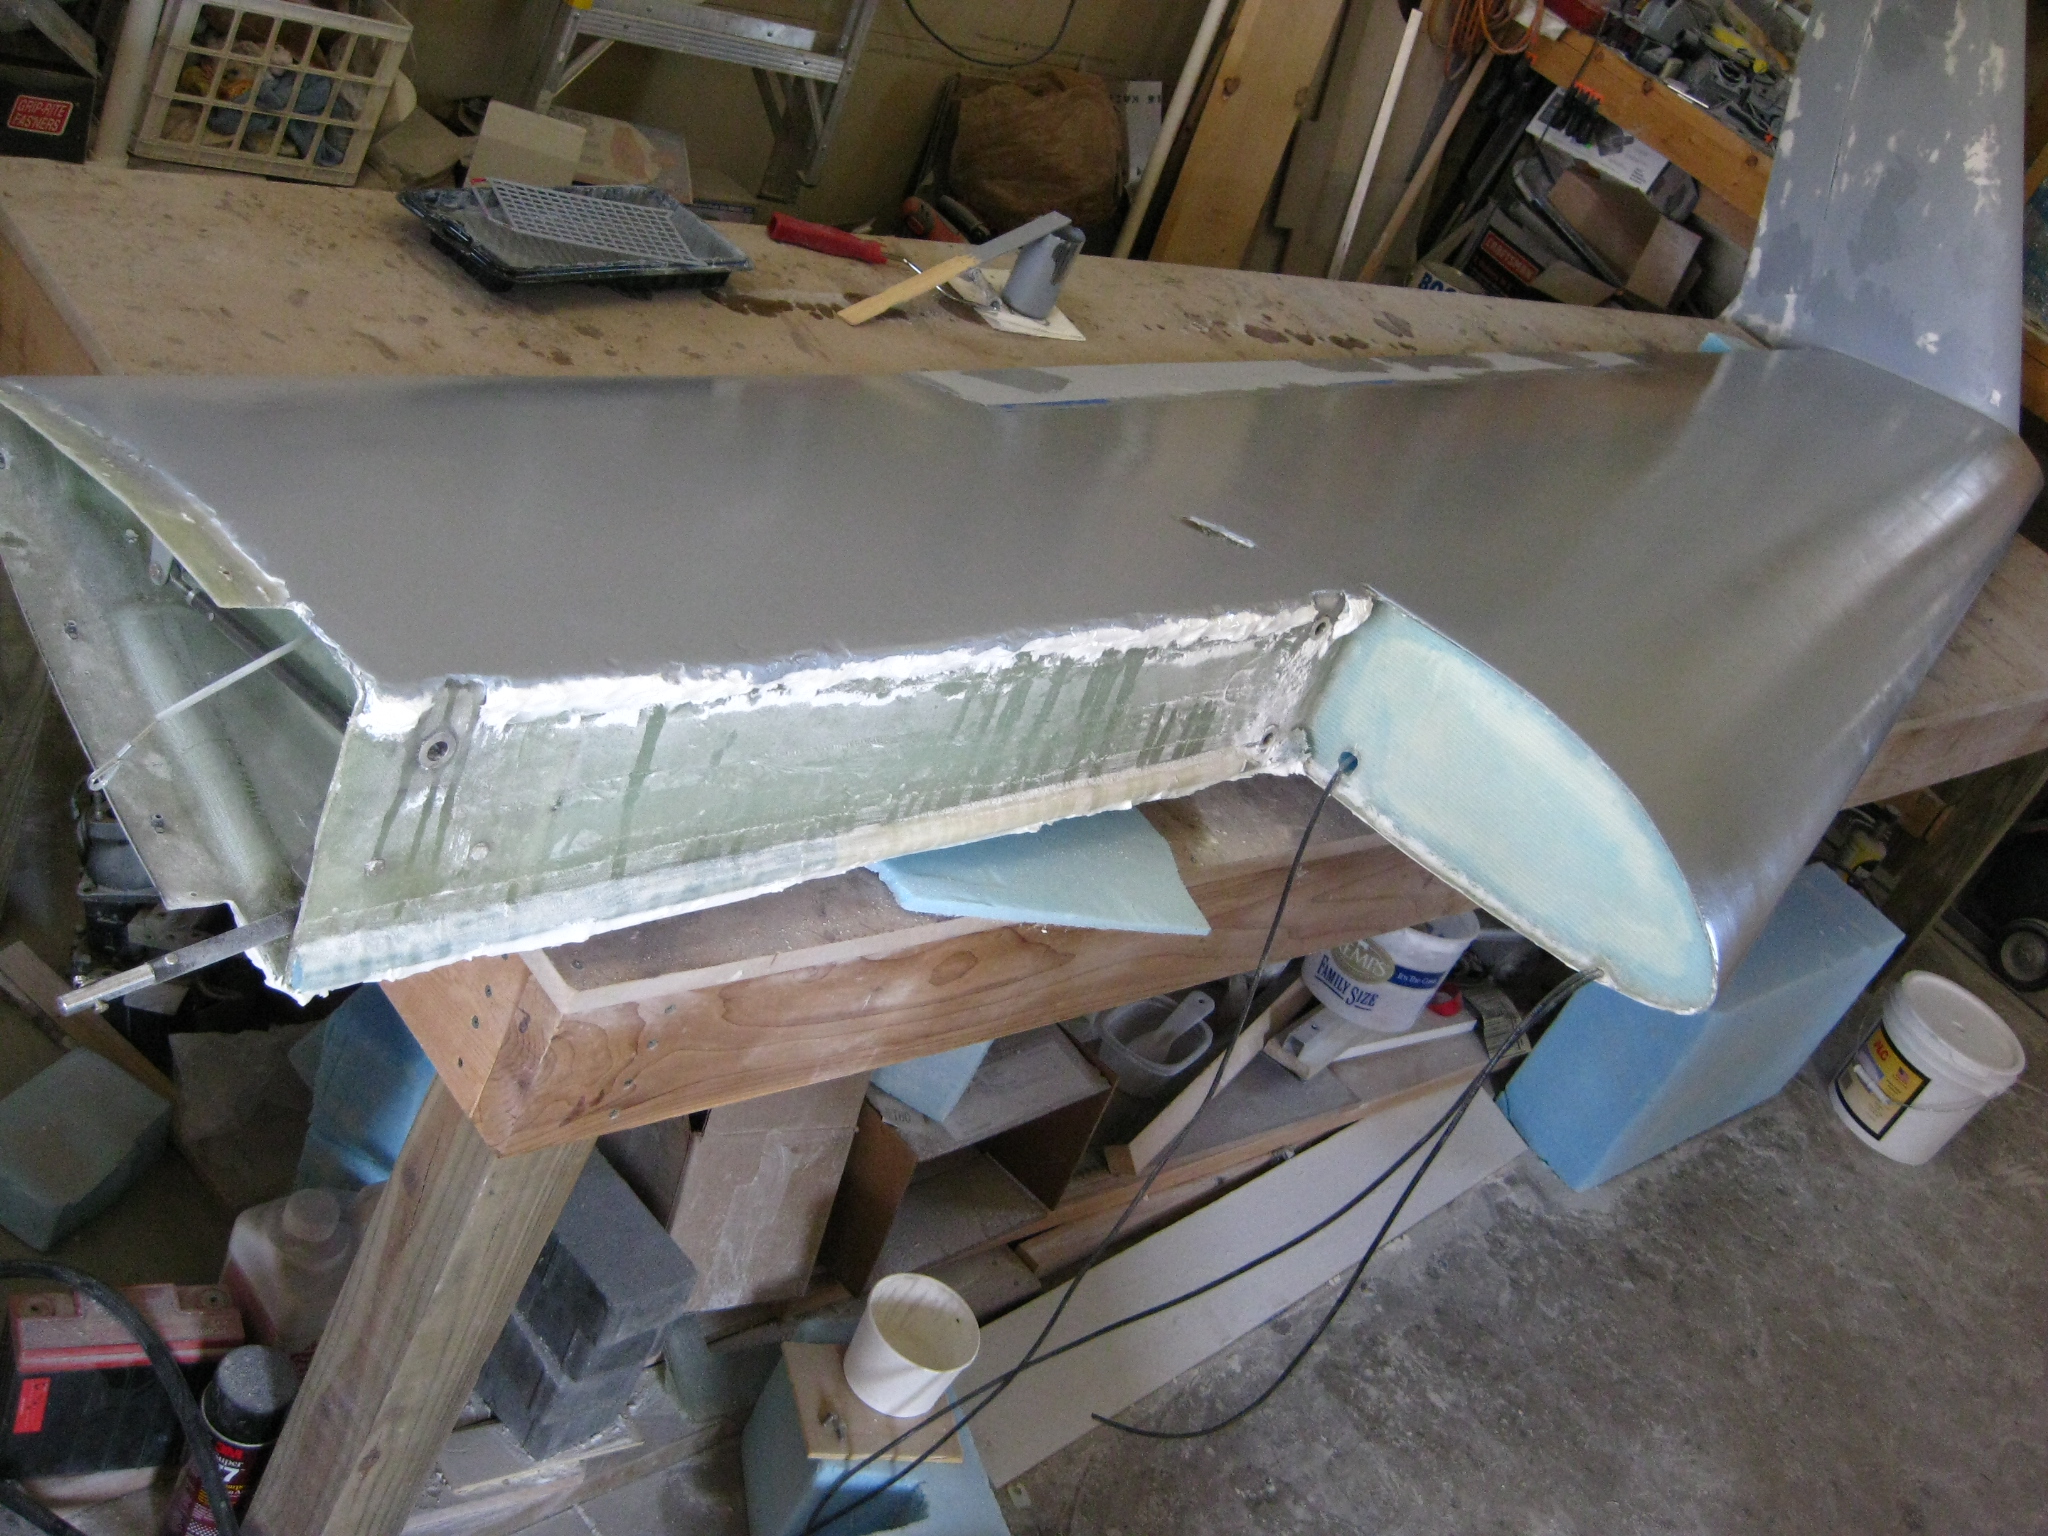
The first step in the finishing process is one such step which we’ve chosen to implement a method other than specified by plans. Coarse fill is accomplished by first hand sanding the structure. The reasons for this are very valid. If one were to block sand, one would cut the top layers of glass off before getting the low lying layers also requiring sanding. This, of course, is not ideal. In order to avoid this dilemma the plans specify to hand sand using your fingers to apply pressure to all the low lying areas equally with top layers. While this works, it takes a lot of time. Following the lead of Wayne Hicks, we decided to sand blast our entire project in preparation for course fill.
Many balked at the thought of sandblasting a plastic airplane. Wayne’s response to these concerns is as accurate as it is humorous: “What are you using 12,000psi and rocks?” While we have come to trust Wayne’s solutions (almost too much), we didn’t just grab the gun and point it at our plane. We too tested on a scrap piece first. We started by using 40psi and fine glass bead media. All we managed to do was make a mess. It had zero effect on the surface. Bumped the pressure up to 80psi…still no effect. Even at the 120psi Wayne used we found no results. Apparently fine glass bead media just doesn’t work on glass. Seems strange, but on a whim we tried using the plain silica sand that we removed from the borrowed sand blaster. With line pressure set at 90psi, we found the sand worked beautifully. Even after holding the gun about 2″ from the test piece for about a minute, there was hardly a depression made. By simply keeping the gun moving the same way one would use a paint gun, you can prep the surface for course fill in a fraction of the time required by hand sanding. In the first picture below you can see how the prepped surface of one of the strake looks compared to un-prepped.
We didn’t want to do this in our garage, as we still have one car, and a lot of equipment we didn’t want to make a mess of. Doing this at the hangar would work, but our big air compressor requires 220V power, and our smaller compressor just isn’t big enough to keep up. So we set up shop in the driveway (see below). In 8 hours we managed to prep the entire outside of the fuselage (strakes included), the canard, the top of one wing, and the entire winglet of that wing…and then the snow came…arrgh.
We are hopeful that the weather will cooperate enough this last week of October to allow us to finish the bottom of the one wing, as well as all of the other wing.
While a tropical heat wave was not in order, mother nature cooperated for her part by at least agreeing to hold the snow for a couple of days. For our part, we didn’t let night (nor the 29 degree temp) stop us from finishing up the surface prep. At this point we broke from this chapter to continue work on the electrical system, and engine installation. We will return after those tasks are complete.
The electrical and engine chapters consumed the majority of the winter ’08 and spring ’09 months, but with summer upon us we find ourselves ready to undertake what most consider ‘the final 90%’ of composite construction. The plans method of finishing works like this:
First we hand sand every inch of the plane to prep the surface for micro. Then we apply a coat of very dry micro and allow it to cure. Then using large fairing blocks, we hand sand most of this micro off while trying to bring the surface into with .030″ of perfect contour. This microfill, and sand process is repeated until we’re within .030″ everywhere. Then a thick high build primer from Sterling is brushed or rolled on, allowed to cure, and sanded to achieve a perfect contour and no pin-holes. Next the sealer/primer of the paint system is applied, and the final sand is done to perfect the surface for the top coat. While this sounds very reasonable, the reality of how this process works is far from ideal. First, dry micro is incredibly difficult to spread without air bubbles, which results in a lot of sanding and re-filling of the ‘big fill’ stage. This also creates much difficulty in filling the pinholes, as the primer will likely ‘bridge’ the pinhole, but not fill it. Later, heat causes the trapped air to expand, and the paint cracks open.
As we mentioned earlier, there are what we feel are better methods requiring less time and headache. All of these methods are detailed on Wayne Hicks site. “Finishing a Composite Airplane” is an article written by George Sychrovsky, which we would consider required reading for anyone about to start this process.
We’ve already discussed the sandblasting method for surface preparation. Next is the big fill. We’ll be following George and Wayne’s advice – Fill Once! At first blush one might think this is suicide for your sanding arm. All that fill has to be contoured, most will be removed. Isn’t that going to take a LOT of sanding??? The answer – Not if you cheese grate it! Cheese grating is a technique by which you allow the micro to cure only to the ‘rubbery’ stage before beginning to sand it off. It is absolutely amazing how well cheese grating works. The micro balls up under the 36 grit sanding board, but does not stick. This has so many advantages it’s a wonder it’s not standard practice. First, as anyone who has sanded micro will tell you, sanding cured micro will turn your shop into a dust storm. Rubbery micro doesn’t land but a few inches from where you’re sanding. It’s likely you wouldn’t even need a dust mask for sanding this (we still wear them though). Second, the rubbery micro is easier for the sandpaper to cut, thus dramatically extending the life of your sandpaper. Not that sandpaper is a major cost in this project, but not having to stop to change it so much sure is nice. Lastly, as mentioned above, the rubbery micro cuts much easier, making it sand off MUCH faster with very little effort. Of course you don’t get something for nothing right? The only catch is, you have to catch the micro at right time. Wayne mentions between 1 and 2 hours to reach the rubbery or ‘greening’ stage. We live in a little cooler climate than Wayne, and have seen more like 2 to 2.5 hours. So the catch is, you can’t spread micro before going to bed and expect to wake up 8 hours later for some cheese grating. There is one last benefit that I haven’t mentioned yet. If you find after cheese grating the micro to contour that you still have a low spot, you can immediately apply another coat of micro, and re-cheese grate in another 2 hours. So after the big fill has been cheese-grated off, we allow it to finish curing, then perform a ‘polish sand’ by going over it with 80 grit. This doesn’t take long at all, as you’re really only sanding out the deep 36 grit scratches.
Our next step in the normal process would be a high build primer, but we’re going to use a technique called ‘skim coating’ or the ‘raw epoxy wipe’. Remember the mention of filling all those pinholes, air pockets, gouges, etc..? We don’t want to risk bridging them with primer or filler, so as long as we don’t have any more than .020″ deep we’re going to fill them with raw epoxy. We do this by brushing on the same West System epoxy we use for making micro. We let it sit for a few minutes to let it flow into the scratches and pinholes, then squeegee it off, leaving a thin coat of raw epoxy on the surface. We let that sit for about 30-45 minutes to get tacky, the apply another coat. After about 4-5 coats, all the surface scratches, pinholes, etc. will be filled with raw epoxy. We let this fully cure, then sand with 150 grit. This should leave us with a smooth surface ready for primer.
The high build primer we’ve chosen is from PPG, and is compatible with the top coat system we’ll be using. We’re rolling on the Deltron DPS3055 Acrylic Urethane primer. Yup, you read that right…with a roller. I’m sure folks from PPG would cringe at reading that, but in sticking with the prime directive of one application and then sand to perfection, rolling allows for a pretty thick coat that ensures we fill any of the low spots. Low spots have become increasing more difficult to detect by hand after the raw epoxy step. To touch, it felt to us like all was perfect and ready for final paint. The canard is the first component we’re finishing, and it’s a pretty big span. To aid in finding low spots, a little bit of water is a big help. Mist a little water on the surface and it will run off everywhere….except for low spots. Our low spots were pretty minimal, and near impossible to measure with the micrometer, but we wanted the primer/surfacer on thick enough to allow for filling of any low spots, while still leaving a good layer of protection after sanding. This primer will be the exposed surface during phase one testing, and will be again be sanded before the primer/sealer and top coats are applied.
So this process is basically one of ‘rinse and repeat’. After major and any minor fill is complete on one surface, we flip the part over and fill the other side. Then we move on to the skim coating, flip the part again to skim coat the other side, then move on to primer. One last flip to finish the priming and the part is ready for final assembly. Being we keep repeating this, we haven’t really been updating this text with what’s going on. We’ll just explain any troubles we run into or tips to pass along.
First and foremost, we found it’s important not to be careless about closing up the control surface gaps with micro. Our initial thought was that so long as we could still see the line where the control surfaces end, we could easily cut them back free again, and then sand the edges for a nice tight fit. While this seemed good in theory, in practice the micro oozes down inside the gap and makes for a bit of a tough time getting it free again after it’s cured. On the second wing, we learned to do the cutting free of the control surface right after the cheese grating, while the micro was still soft and easy to cut.
After the wings and winglets were in primer, we turned our attention to the strakes. In hindsight we probably should have done the wings and strakes at the same time while they were bolted together. We were never really happy with the way the strakes turned out at the leading edges, particularly the fairing block between the strake leading edge and the wing leading edge. “Carve to a pleasing shape” has got to be the most frustrating instruction in the entire plans. Some people can sculpt…some can not. We are part of the latter group. For now we will carry on as they are.
With the top of the strakes complete we began filling the top of the fuselage. At first glance it would seem as though it should go quickly, as almost half of the top of the fuselage surface is canopy/windows that obvious don’t get filler. One learns quickly though that it’s not the surface area that consumes all the time, its dealing with all the joints. To finish out a joint neatly, one starts by filling the higher of the two sides of the joint, using tape or cling wrap to keep micro off the lower side (for the moment anyway). Once the higher side of the joint is sanded smooth and flat, it is then protected with tape or cling wrap while the lower side is filled and sanded flush. The tape or cling wrap will be all that is left for a gap at the joint, so depending on the nature of the joint one may have to actually sand a slightly larger gap to allow for expansion/twisting/etc without causing chipping.
Sadly, a 7 month gap in progress is inserted here.
Work resumes with the minor fill of the fuselage top, more sanding, primer/surfacer, and yup….more sanding. With the top complete and ready for primer/sealer, the fuselage must now be flipped over to finish the bottom side.
Once the fuselage was flipped, we then bolted the port side wing back on (albeit upside down), so that we could match the strake outboard edge to the wing inboard edge. We started by applying major fill to this perimeter to establish a level joint. We then removed the port side wing and attached the starboard wing, and applied the same fill. With the level established we could then removed the starboard wing. With the wings attached upside down, the fuselage must be elevated at least 48″ from the ground to allow the winglets enough clearance. This makes it difficult to work on the surface of the strakes. Ensuring the perimeter of the strakes are level with the wing surfaces, allows the removal of the wings, and thus the fuselage may be lowered to ease the fill of the strakes.
Once the bottom was finished, we flipped it back over and set it back on it’s main gear. The last things to finish up are to make nice edges where the canopy and window glass meets the frame.
After a wonderful trip to the Central States Fly-In 2010 in Rough River, KY, we made a slight change to our finishing plans. Our original plan called for conducting phase 1 testing in primer, in case we needed to make any change to wing or canard incidence. Doing so would require a little patch work to finish fill, and to paint as well. Waiting with top coat would prevent unsightly patches in the paint (especially the pearl white we’ve chosen). What we learned at Rough River though is that it is best to protect the porous primer from dirt and bugs with some sort of top coat, otherwise you’ll end up sanding away all the primer and maybe even some micro to get a clean surface for the final paint. Sooo…we chose a simple white, single stage (PPG DCC system) for a ‘phase 1 top coat’.
It’s been said in the automotive refinish world that if you want to see how bad your body work is, just paint it. Good autobody guys are able to feel the slightest imperfections by hand. Apparently that skill is lacking in our shop. After the paint went on, it was obvious that the underlying body work was lacking. At this point it’s hard to know how to proceed.
After a few days of sulking and a some realization that it is just micro and paint, all it takes is…you guessed it…MORE SANDING! After about another 30-40 hours of sanding, micro, primer, and more paint, the joints that were the biggest concern, were near perfect. The paint work is still, well, awful. We decided we could live it with for now, being it’s just the paint to protect the structure during phase 1. Once flight testing is done, we’ll have the final color shot by a pro. For now we pressed on with reinstalling all the systems removed for finish work.
Once all was reinstalled, it was that bitter sweet moment when the airplane had to leave the garage and settle in to her new home at St. Cloud Regional Airport (KSTC). It was very exciting to load it up and deliver it to the hangar. Returning to the garage later that night was strange though. For 5 years our garage had been transformed into an aircraft manufacturing facility, and for the first time in those 5 years, there was now no aircraft. Now we’re left to wonder…can we possibly clean up the mess the plane left behind, in less time than it took to create it??? For the moment we’re declaring an end to this chapter, but after phase 1 testing we will repaint the plane in the final color.
Having completed phase 1 and given a few required rides, it was time to repaint the plane in it’s final colors to make it a bit more presentable. The colors we chose were Starfire White Pearl with Viper Blue accents. We also made use of the downtime to install wheel pants, and make a few cosmetic corrections. We initially estimated about 3-4 weeks to complete the repaint. We started on Memorial Day weekend (2013), and were finally 100% back together and ready to fly on September 14th….a few more weeks than we had anticipated. There are still some cosmetic imperfections we would like to someday fix, but for now the plane looks 100% better than it did, and we at least won’t be too ashamed of it sitting on a ramp somewhere. Time to enjoy it now!